Picture Picture Frames and Free Heart Printable
The Bold Abode is a participant in the Amazon Services LLC Associates Program, an affiliate advertising program designed to provide a means for sites to earn advertising fees by advertising and linking to amazon.com as well as other affiliate networks.
Picture frames are everywhere, yo.
So, today… let’s be different… let’s think outside of the frame…hehehe.
Let’s make some Picture Picture frames.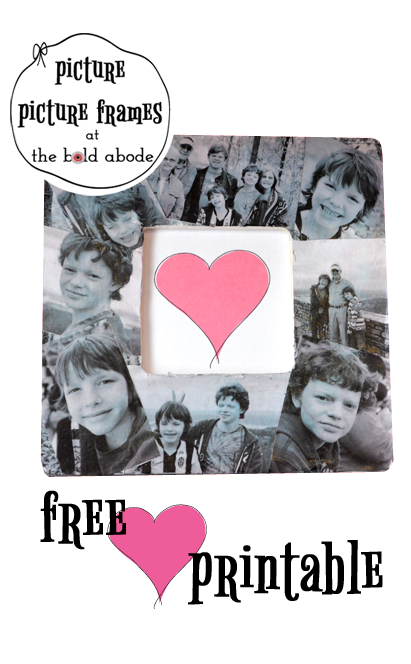

Picture Picture Frames
supplies
Dollar Frame from Michael’s
Black and White photographs
A Black and White background image
Mod Podge
Heart Printable
1. Print out a generic black and white photograph like this forest scene.

2. Trace the frame onto your black and white background image.

3. Cut it out. </duh>

4. Mod Podge the cut out onto the frame.
I’m no expert, so follow the directions on the Mod Podge site, yo.

5. Stop. It looks pretty cool already, no?
But if you want to make the picture picture frame, just layer your black and white photographs on top of the background image and mod podge them on, too.

6. Trace the frame opening around the heart. You can download my FREE heart printable by clicking this link.
Here you can see why the background image is helpful…

Boo.
And here’s a little tip… you can learn from my big, fat trial and error…

Boo, again.

There ya go!

And if anyone out there does this better than I do, can you give me some private mod podge lessons? I think I may need some one on one tutoring so I can figure this stuff out…
But those cutie-patooties look good anyhow, anywhere… and it’s getting easier every time I try it, so that’s something!
If you make your own picture picture frame, let me know… I’d love to see how yours turns out!
Looking for more easy craft ideas you can do in 30 minutes or less? Just click the image below!

*This post contains Amazon Affiliate links.


these are adorable! i really love the trees one- very cool! it would be fun to do as a teacher gift with pics of all the students and then some fun saying or a simple thank you in the frame part.
That would be a great idea! I’ll have to remember that one, Cassie!
Adorable Gwen! Love the heart printable!
Thanks, Heather! It was actually fun to make!
You are quickly becoming the reigning queen of crafts. Martha don’t got nothin on you!!! Seriously, the frame is awesome. Love the heart printable. Pinning to save for later. Have a good day Gwennie!
Oh gosh, Ann! I’m not sure about that, but I’ll take it and say a hearty THANK YOU!
You’re too sweet….
Very crafty Gwen. I have felt so unproductive in the craft area lately – I need to find a project!
It comes in fits and spurts, doesn’t it!
Thanks, Eileen!
The mini me’s are getting so big!
Try sanding the edges with an emery board in those hard to reach spots!
Tell me about it! I can’t stand it!
I’m going to go try that on the Mod Podge and see if it will smooth that out a little!
These are so cute, Gwen! What a clever idea for a wedding gift!
Have an awesome day rock star!
karianne
Thanks, Kari! These would make great wedding presents!
Cute idea and thanks for the tip to not trim after Mod Podging. I Have a HUGE bottle of the stuff bought for craft projects that exist mostly in my head and that should come in handy should I ever try any of them for reals.
You have a huge bottle of wine for us?
Oh, sorry… I read that wrong!
Get to crack-a-lacking, girl!
What a cute idea to put the photos on the frame!!!
Thanks, Holly! I really love them…
Love Love those $1.00 picture frames from Michaels!! Beautiful job!
Thank you so much, Laura Beth! I’m going to make some more so I can perfect my Mod Podge technique…hehe…
I have done a lot of Mod Podging. I have found a way of not having to cut the paper exact. I can’t trim a picture good so I cut out the area I want a little bigger then the shape. For example I have done a lot of decoupaging chip board letters. So I trace the letter and cut out wider then I need. After podging it on I let it dry. Then take a emery board and scrape the paper away going from front to back.If you do it back to front you will tear the paper. I then coat the front side with Mod Podge. Another thing you can do is pour out enough Mod Podge you will need to coat a piece and add fine glitter to it. The glitter is embedded in the Mod Podge and doesn’t shake off that way. I don’t really know when this was posted and you may already learned alot of these things just couldn’t resist trying to help a fellow crafter
Thanks so much for the tips, Judi! I’m always open to learning better ways to do Mod Podge!